14 KiB
Image taken from Raspberry Pi website. Raspberry Pi is a trademark of the Raspberry Pi Foundation
Getting started on the Raspberry Pi
The FSFW can be run on a Raspberry Pi with the Linux OSAL, using an ARM linux cross compiler. Instructions will be provided on how to do this.
General Information
The following instructions will show how to install the cross compiler on a host machine and mirror the Rapsberry Pi sysroot folder on the host machine so that the same libraries and headers used on the Raspberry Pi are used for the cross-compilation process. The provided Eclipse project files and launch configurations also provide a starting point to perform remote debugging on a Raspberry Pi, using a SSH connection.
Prerequisites for direct compilation and cross-compiling
- SSH connection to the Raspberry Pi working
- Raspberry Pi linux environment set up properly
- CMake and rsync installed
Setting up general prerequisites for Linux systems
-
Install CMake and rsync
sudo apt-get install cmake rsync -
Configure the Raspberry Pi Linux environment. The last section of the Linux REAMDE specifies how to set up a UNIX environment for the FSFW and is also applicable to the Raspberry Pi. SSH into the Raspberry Pi and follow the instructions in that section.
-
Install the
gpiodlibrarysudo apt-get install gpiod libgpiod-dev
Getting started on the Raspberry Pi
Make sure to follow the steps above. Now you should be able to build the software on the Raspberry Pi. A ssh connection to the Raspberry Pi is assumed here
You can build the software with the following commands
mkdir build-Debug-RPi
cd build-Debug-RPi
cmake -DOS_FSFW=linux -DTGT_BSP=arm/raspberrypi -DLINUX_CROSS_COMPILE=OFF -DCMAKE_BUILD_TYPE=Debug ..
cmake --build . -j
Prerequisites for cross-compiling
These prerequisites are valid for Linux as well as Windows hosts.
- ARM Linux cross compiler installed
- Raspberry Pi sysroot folder mirrored on the host machine, using
rsync - gdb-multiarch installed on host for remote debugging or TCF agent running on Raspberry Pi
Cross-Compiling on a Linux Host
Steps tested for Ubuntu 20.04. Adapt accordingly for used Linux distribution. The following steps are based on this stackoverflow post. For the steps show here, we are also going to assume that a new Raspbian image based on Debian buster is used. If this is not the case, it is recommended to follow the steps in the stackoverflow post above and to make sure that the toolchain binaries are added to the path accordingly.
Setting up prerequisites for cross-compiling
-
Install the pre-built ARM cross-compile with the following command
wget https://github.com/Pro/raspi-toolchain/releases/latest/download/raspi-toolchain.tar.gzPlease note that this version of the toolchain might become obsolete in the future. If another toolchain installation is used, it is still recommended to unpack the toolchain in the
/opt/cross-pi-gccfolder so that the Eclipse configuration and helper scripts work without adaptions. Add the folder to the system path. On Linux, this can generally be done with the following commandexport PATH=$PATH:"/opt/cross-pi-gcc/bin"You can add this line to the
.bashrcor.profilefile in the$HOMEdirectory to add environmental variables permanently. More experienced users can perform this step is a shell script which issourced to keep the environment clean.Test the toolchain with the following command
arm-linux-gnueabihf-gcc --version -
Set up a sysroot folder on the local host machine. Make sure the SSH connection to the Raspberry Pi is working without issues. Then perform the following steps
cd ~
mkdir raspberrypi
cd raspberrypi
mkdir rootfs
cd rootfs
pwd
The result of the
pwdcommand will be used later to sync the root file system of the Raspberry Pi to the host machine. With a Raspberry Pi 4, you can replace<ip-address>withraspberrypi.localand when using the default rootfs path, you can replace<rootfs-path>with$HOME/raspberrypi/rootfs.rsync -vR --progress -rl --delete-after --safe-links pi@<ip-address>:/{lib,usr,opt/vc/lib} <rootfs-path>Please note that there might be issues with some symlinks or libraries not being copied properly. This has occured with files like
libc.so.6. If there are linker issues at a later stage, you can try to rerunrsyncwithout the--safe-linksflag or copy the shared libraries or symlinks manually from the Raspberry Pi to the sysroot withscp.For example, you can copy
libc.so.6from the Raspberry Pi to the sysroot with the following commandscp pi@<ip-address>:lib/arm-linux-gnueabihf/lib.so.6 <rootfs-path>/lib/arm-linux-gnueabihf -
It is recommended to install
gdb-multiarch. This tool will allow remote debugging on the host computer. You don't need to do this if the TCF agent is used.sudo apt-get install gdb-multiarch -
Perform the steps in the cross-compile section to build the software for the Raspberry Pi and test it.
Cross-Compiling on a Windows Host
Additional Prerequites
- MSYS2 installed. All command line steps shown here
were performed in the MSYS2 MinGW64 shell (not the default MSYS2, use MinGW64!).
Replace
<UserName>with respectively. It is recommended to set up aliases in the.bashrcfile to allow quick navigation to thefsfw_examplerepository and to rungit config --global core.autocrlf truefor git in MinGW64.
Setting up prerequisites for Windows
-
Install CMake and rsync in MinGW64 after installing MSYS2
pacman -S mingw-w64-x86_64-cmake rsync -
Configure the Raspberry Pi linux environment. The last section of the Linux REAMDE specifies how to set up a UNIX environment for the FSFW and isalso applicable to the Raspberry Pi. SSH into the Raspberry Pi and follow the instructions in that section.
-
Install the correct ARM Linux cross-compile toolchain provided by SysProgs. You can find out the distribution release of your Raspberry Pi by running
cat /etc/rpi-issue.Test the toolchain by running:
arm-linux-gnueabihf-gcc --version -
Set up a sysroot folder on the local host machine. Make sure the SSH connection to the Raspberry Pi is working without issues. Then perform the following steps
cd /c/Users/<UserName>
mkdir raspberrypi
cd raspberrypi
mkdir rootfs
cd rootfs
pwd
Store the result of
pwd, it is going to be used byrsynclater.Now use rsync to clone the Rapsberry Pi sysroot to the local host machine. With a Raspberry Pi 4, you can replace
<ip-address>withraspberrypi.local. Use the rootfs location stored from the previous steps as<rootfs-path>.rsync -vR --progress -rl --delete-after --safe-links pi@<ip-address>:/{lib,usr,opt/vc/lib} <rootfs-path> -
There might be some issues with the pthread symbolic links. Navigate to the folder containing the symlinks
cd /c/User/<UserName>/raspberrypi/rootfs/usr/lib/arm-linux-gnueabihfType
more libpthread, pressTABand check whether the symbolic linklibpthread.sois shown. If it is not, we are going to set it up manually to avoid issues when linking againstpthreadlater.Run the following command to create a symlink to
libpthread.so.0ln -s ../../../lib/arm-linux-gnueabihf/libpthread.so.0 libpthread.soPlease note that there might also be issues with some symlinks or libraries not being copied properly. This has occured with files like
libc.so.6. If there are linker issues at a later stage, you can try to rerunrsyncwithout--safe-linksor copy the shared libraries or symlinks manually from the Raspberry Pi to the sysroot withscp.For example, you can copy
libc.so.6from the Raspberry Pi to the sysroot with the following commandscp pi@<ip-address>:lib/arm-linux-gnueabihf/lib.so.6 <rootfs-path>/lib/arm-linux-gnueabihf -
It is recommended to install
gdb-multiarch. This tool will allow remote debugging on the host computer. Replacex86_64with the correct processor architecture for other architectures.pacman -S mingw-w64-x86_64-gdb-multiarch -
Perform the steps in the following chapter to build the software for the Raspberry Pi and test it.
Testing the cross-compilation
It is recommended to set the following environmental variables for the CMake build:
CROSS_COMPILE: Explicitely specify the name of the cross compilerRASPBERRY_VERSION: Explicitely specify the version of the Raspberry PiRASPBIAN_ROOTFS: Explicitely set the path to the local RPi rootfs
For example with the following commands
export CROSS_COMPILE="arm-linux-gnueabihf"
export RASPBERRY_VERSION="4"
export RASPBIAN_ROOTFS="<pathToRootFS>"
It is recommended to test whether the environmental variables were set correctly, for example by running
echo $RASPBIAN_ROOTFS
These variables can either be set every time before a debugging session to
keep the environment clean (should be done before starting Eclipse)
or permanently by adding the export commands to system files.
A helper script has been provided in cmake/scripts/RPi to perform
setting up the environment. The scripts need to be sourced instead of
being run like regular shell scripts.
You can also set up the environmental variables permanently by adding the
export commands to the .profile or .bashrc file in the $HOME folder.
On Windows, MinGW64 was used to set up the build system, so you can use the
MinGW64 .bashrc file to do this. If you are using Eclipse to build
the software, Eclipse will have the system variables from Windows,
so it is recommended to either permanently set the three environmental
variables in the Windows system environmental variables or add them in
Eclipse. See the Eclipse README for more information.
Now we can test whether everything was set up properly by compiling the example
and running it on the Raspberry Pi via command line.
Navigate into the fsfw_example folder first.
-
Build the software locally to test the cross-compilation process. We are going to create a Debug build directory first.
mkdir build-Debug-RPi cd build-Debug-RPi -
Configure the build system. On Linux, run the following command:
cmake -G "Unix Makefiles" -DOS_FSFW=linux -DTGT_BSP=arm/raspberrypi -DLINUX_CROSS_COMPILE=ON -DCMAKE_BUILD_TYPE=Debug ..On Windows, replace
-G "Unix Makefiles"with-G "MinGW Makefiles".Alternatively, you can use the helper shell scripts located inside
cmake/scripts/RPi/crosscompileor the Python helper scriptcmake_build_config.pyinside thecmake/scriptsfolder. TheRPifolder also contains template shell files which can besourced to quickly set up the environmental variables if you want to keep the system path clean. -
Run the binary to test it
scp fsfw_example pi@raspberrypi.local:/home/pi/fsfw_example
ssh pi@raspberrypi.local
./fsfw_example
Setting up Eclipse for a Raspberry Pi remote target
It is recommended to use the provided Eclipse project files and launch configurations to have a starting point. See the specific section in the Eclipse README for information how to do this.
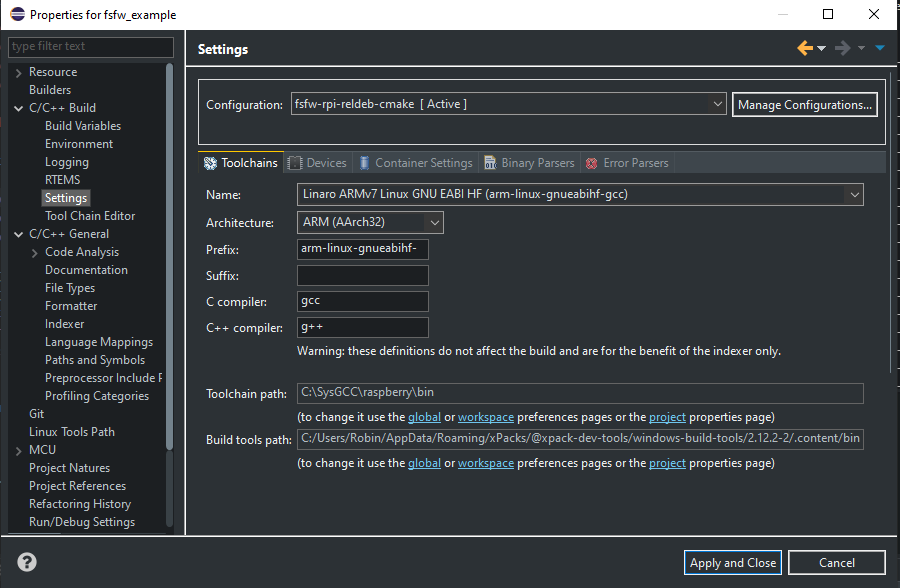
Windows
There are some additional steps necessary on Windows: The cross-compiler by
default is configured to look for the cross-compiler in /opt/cross-pi-gcc/bin.
The toolchain path needs to be corrected, for example like shown in the following image:
Setting up the TCF agent on the Raspberry Pi
It is recommended to set up a TCF agent for comfortable Eclipse remote debugging. The following steps show how to setup the TCF agent on the Raspberry Pi and add it to the auto-startup applications. The steps are taken from this guide
-
Install required packages on the RPi
sudo apt-get install git uuid uuid-dev libssl-dev -
Clone the repository and perform some preparation steps
git clone git://git.eclipse.org/gitroot/tcf/org.eclipse.tcf.agent.git cd org.eclipse.tcf.agent.git/agent cp -R machine/arm machine/armv6l -
Build the TCF agent
makeand then test it by running
obj/GNU/Linux/armv6l/Debug/agent –S -
Finally instal lthe agent for auto-start with the following steps. The last step did not work on a Rapsberry Pi 4, but apparentely was not necessary.
cd org.eclipse.tcf.agent/agent
make install
sudo make install INSTALLROOT=
sudo update-rc.d tcf-agent defaults
sudo update-rc.d tcf-agent enable 2
The Eclipse README specifies how to perform remote debugging using the TCF agent.