EIVE On-Board Software
General information
Target systems:
- OBC
- Xiphos Q7S
- Based on Zynq-7020 SoC (xc7z020clg484-2)
- Dual-core ARM Cortex-A9
- 766 MHz
- Artix-7 FPGA (85K pogrammable logic cells)
- Datasheet at https://eive-cloud.irs.uni-stuttgart.de/index.php/apps/files/?dir=/EIVE_IRS/Arbeitsdaten/08_Used%20Components/Q7S&fileid=340648
- Also a lot of informatin about the Q7S can be found on the xiphos trac platform: https://trac.xiphos.com/trac/eive-q7/wiki/Q7RevB
- Linux OS
- Built with Yocto 2.5
- Linux Kernel https://github.com/XiphosSystemsCorp/linux-xlnx.git
- Host System
- Generic software components which are not dependant on hardware can also be run. All host code is contained in the hosted folder
- Tested for Linux (Ubuntu 20.04) and Windows 10
Setting up development environment
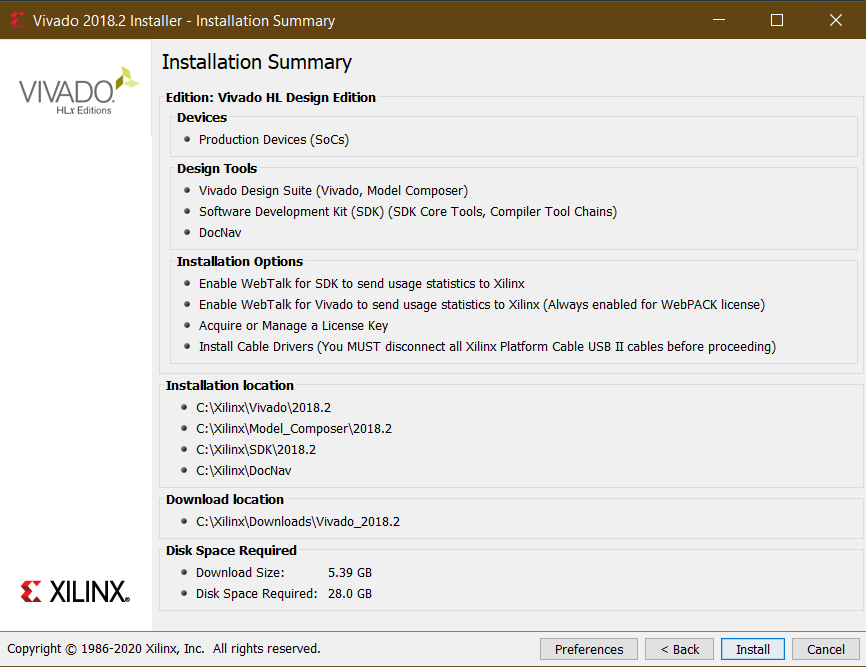
- Install Vivado 2018.2 and Xilinx SDK from https://www.xilinx.com/support/download/index.html/content/xilinx/en/downloadNav/vivado-design-tools/archive.html. Install the Vivado Design Suite - HLx Editions - 2018.2 Full Product Installation instead of the updates. It is recommended to use the installer
- Install settings. In the Devices selection, it is sufficient to pick SoC → Zynq-7000:
- For supported OS refer to https://www.xilinx.com/support/documentation/sw_manuals/xilinx2018_2/ug973-vivado-release-notes-install-license.pdf
- Add path of linux cross-compiler to environment variables SDK\2018.2\gnu\aarch32\nt\gcc-arm-linux-gnueabi\bin
- Install make (only on windows, SDK on Linux can use the make installed with the SDK)

Installing make on Windows
- Install NodeJS LTS
- Install xpm
npm install --global xpm
- Install Windows build tools (after installation also linux commands like mkdir can be used from windows)
xpm install --global @xpack-dev-tools/windows-build-tools@latest
Building the software
- Clone the repository with
git clone https://egit.irs.uni-stuttgart.de/eive/eive_obsw.git
- Update all the submodules
git submodule init
git submodule sync
git submodule update
- Open Xilinx SDK 2018.2
- Import project
- File → Import → C/C++ → Existing Code as Makefile Project
- Set build command. Replace <target> with either debug or release.
- When on Linux right click project → Properties → C/C++ Build → Set build command to
make <target> -j- -j causes the compiler to use all available cores
- The target is used to either compile the debug or the optimized release build.
- On windows create a make target additionally (Windows → Show View → Make Target)
- Right click eive_obsw → New
- Target name: all
- Uncheck "Same as the target name"
- Uncheck "Use builder settings"
- As build command type:
make -j <target> WINDOWS=1
- When on Linux right click project → Properties → C/C++ Build → Set build command to
- Run build command by double clicking the created target or by right clicking the project folder and selecting Build Project.
Debugging the software (when workstation is directly conncected to Q7S)
-
Assign static IP address to Q7S
- Open serial console of Q7S (Accessible via the micro-USB of the PIM, see also Q7S user maunal chapter 10.3)
- Baudrate 115200
- Login to Q7S:
- user: root
- pw: root
- Set IP address and netmask with
ifconfig eth0 192.168.133.10 ifconfig eth0 netmask 255.255.255.0 -
Connect Q7S to workstation via ethernet
-
Make sure the netmask of the ehternet interface of the workstation matches the netmask of the Q7S
- When IP address is set to 192.168.133.10 and the netmask is 255.255.255.0, an example IP address for the workstation is 192.168.133.2
-
Run tcf-agent on Q7S
- Tcf-agent is not yet integrated in the rootfs of the Q7S. Therefore build tcf-agent manually
git clone git://git.eclipse.org/gitroot/tcf/org.eclipse.tcf.agent.git cd org.eclipse.tcf.agent/agent make CC=arm-linux-gnueabihf-gcc LD=arm-linux-gnueabihf-ld MACHINE=arm NO_SSL=1 NO_UUID=1- Transfer executable agent from org.eclipse.tcf.agent/agent/obj/GNU/Linux/arm/Debug to /tmp of Q7S
cd obj/GNU/Linux/arm/Debug scp agent root@192.168.133.10:/tmp- On Q7S
cd /tmp chmod +x agent- Run agent
./agent -
In Xilinx SDK 2018.2 right click on project → Debug As → Debug Configurations
-
Right click Xilinx C/C++ applicaton (System Debugger) → New →
-
Set Debug Type to Linux Application Debug and Connectin to Linux Agent
-
Click New
-
Give connection a name
-
Set Host to static IP address of Q7S. e.g. 192.168.133.10
-
Test connection (This ensures the TCF Agent is running on the Q7S)
-
Select Application tab
- Project Name: eive_obsw
- Local File Path: Path to eiveobsw-linux.elf (in _bin\linux\devel)
- Remote File Path: /tmp/eive_obsw.elf
Debugging the software via Flatsat PC
Open SSH connection to flatsat PC:
ssh eive@2001:7c0:2018:1099:babe:0:e1fe:f1a5
To access the console of the Q7S run the following:
picocom -b 115200 /dev/ttyUSB0
To debug an application, first make sure a static IP address is assigned to the Q7S. Run ifconfig on the Q7S serial console.
ifconfig
Set IP address and netmask with
ifconfig eth0 192.168.133.10
ifconfig eth0 netmask 255.255.255.0
To launch application from Xilinx SDK setup port fowarding on the localhost.
ssh -L 1534:192.168.133.10:1534 eive@2001:7c0:2018:1099:babe:0:e1fe:f1a5
This forwards any requests to localhost:1534 to the port 1534 of the Q7S with the IP address 192.168.133.10.
Note: When now setting up a debug session in the Xilinx SDK, the host must be set to localhost instead of the IP address of the Q7S.
Launching an application after boot
Load the root partiton from the flash memory (there are to nor-flash memories and each flash holds two xdi images). Note: It is not possible to modify the current loaded root partition.
- Disable write protection of the desired root partition
writeprotect 0 0 0 # unlocks nominal image on nor-flash 0
- Mount the root partition
xsc_mount_copy 0 0 # Mounts the nominal image from nor-flash 0
- Copy the executable to /bin/usr
- Make sure the permissions to execute the application are set
chmod +x application
- Create systemd service in /lib/systemd/system. The following shows an example service.
cat > example.service
[Unit]
Description=Example Service
StartLimitIntervalSec=0

[Service]
Type=simple
Restart=always
RestartSec=1
User=root
ExecStart=/usr/bin/application

[Install]
WantedBy=multi-user.target
- Enable the service. This is normally done with systemctl enable. However, this is not possible when the service is created for a mounted root partition. Therefore create a symlink as follows.
ln -s '/tmp/the-mounted-xdi-image/lib/systemd/system/example.service' '/tmp/the-mounted-xdi-image/etc/systemd/system/multi-user.target.wants/example.service'
- The modified root partition is written back when the partion is locked again.
writeprotect 0 0 1
- Now verify the application start by booting from the modified image
xsc_boot_copy 0 0
- After booting verify if the service is running
systemctl status example
More detailed information about the used q7s commands can be found in the Q7S user manual.
Bringing up CAN
ip link set can0 down
ip link set can0 type can loopback off
ip link set can0 up type can bitrate 1000000
Following command sends 8 bytes to device with id 99 (for petalinux)
cansend can0 -i99 99 88 77 11 33 11 22 99
For Q7S use this:
cansend can0 5A1#11.22.33.44.55.66.77.88
Turn loopback mode on:
ip link set can0 type can bitrate 1000000 loopback on
Reading data from CAN:
candump can0
Setting up UNIX environment for real-time functionalities
Please note that on most UNIX environments (e.g. Ubuntu), the real time functionalities used by the UNIX pthread module are restricted, which will lead to permission errors when creating these tasks and configuring real-time properites like scheduling priorities.
To solve this issues, try following steps:
- Edit the /etc/security/limits.conf file and add following lines at the end:
<username>   hard   rtprio  99
<username>   soft   rtprio  99
The soft limit can also be set in the console with ulimit -Sr if the hard
limit has been increased, but it is recommended to add it to the file as well for convenience.
If adding the second line is not desired for security reasons,
the soft limit needs to be set for each session. If using an IDE like eclipse
in that case, the IDE needs to be started from the console after setting
the soft limit higher there. After adding the two lines to the file,
the computer needs to be restarted.
It is also recommended to perform the following change so that the unlockRealtime script does not need to be run anymore each time. The following steps raise the maximum allowed message queue length to a higher number permanently, which is required for some framework components. The recommended values for the new message length is 130.
- Edit the /etc/sysctl.conf file
sudo nano /etc/sysctl.conf
Append at end:
fs/mqueue/msg_max = <newMsgMaxLen>
Apply changes with:
sudo sysctl -p
A possible solution which only persists for the current session is
echo <newMsgMax> | sudo tee /proc/sys/fs/mqueue/msg_max
or running the unlockRealtime script.
- Run the shell script inside the linux folder
./unlockRealtime
This script executes the sudo setcap 'cap_sys_nice=eip' \<application\>
command on the binaries, increases the soft real time limit of the current
session and increases the maximum number of message queues by setting
/proc/sys/fs/mqueue/msg_max.
All changes are only applied for the current session (read 2. and 3. for
a permanent solution). If running the script before executing the binary does
not help or an warning is issue that the soft real time value is invalid,
the hard real-time limit of the system might not be high enough (see step 1).
Building and running the software on a host system
The host build can be built with following command
make -f Makefile-Hosted all -j
If compiling on Windows, it is recommended to supply WINDOWS=1 .
A release build can be built by using the mission target.
Flight Software Framework (FSFW)
An EIVE fork of the FSFW is submodules into this repository. To add the master upstream branch and merge changes and updates from it into the fork, run the following command in the fsfw folder first:
git remote add upstream https://egit.irs.uni-stuttgart.de/fsfw/fsfw.git
git remote update --prune
After that, an update can be merged by running
git merge upstream/master
Alternatively, changes from other upstreams (forks) and branches can be merged like that in the same way.